How to configure MikroTik - Initial Configuration
In this article you will learn how to quickly set up RouterOS MikroTik for working in a "simple" version, which is suitable for many small offices, home network, etc.
So, for example we have access channel to the Internet, a local area network for 5 computers, 1 of which is server, you must enable the ordinary users via standard protocols (http, https, icq, jabber, ftp), for system administrators workplace do full access to the network, enable the e-mail, ftp and web servers.
LAN IP addresses:
- Mikrotik - 192.168.0.1
- PC 5 - 192.168.0.2
- PC 4 - 192.168.0.10
- PC 1 - 192.168.0.20
- PC 2 - 192.168.0.21
- PC 3 - 192.168.0.22
Provider can provide you with both white and gray ip address, for example, that in our case it is the gray address somewhere in a local network provider.
Step 1. Let’s connect to the router locally to the console, and to protect the “admin” user from breaking off, we will disable him, and instead create a new one.
[admin@MikroTik] > use add name=mkt password=P@S#w0Rd group=full
[admin@MikroTik] > quit
go under the new user and disable admin
[mkt@MikroTik] > user disable admin
[mkt@MikroTik] > user print
Flags: X - disabled
# NAME GROUP ADDRESS
0 X;;; system default user
admin full 0.0.0.0/0
1 mkt full 0.0.0.0/0
Step 2. Interface configuration.
There are several ways, the first - use master, the second - set manually.
First, let’s try to configure interfaces using the wizard. Enter command "setup".
[mkt@MikroTik] > setup
Setup uses Safe Mode. It means that all changes that are made during setup are
reverted in case of error, or if
Ctrl-C is used to abort setup. To keep changes exit setup using the 'x' key.
[Safe Mode taken]
Choose options by pressing one of the letters in the left column, before dash.
Pressing 'x' will exit current
menu, pressing Enter key will select the entry that is marked by an '*'. You can
abort setup at any time by
pressing Ctrl-C.
Entries marked by '+' are already configured.
Entries marked by '-' cannot be used yet.
Entries marked by 'X' cannot be used without installing additional packages.
r - reset all router configuration
+ l - load interface driver
+ a - configure ip address and gateway
d - setup dhcp client
* s - setup dhcp server
p - setup pppoe client
t - setup pptp client
x - exit menu
your choice [press Enter to setup dhcp server]:
Press "a", in the pop-up menu press "a", type in the name of the first interface, specify the IP address.
+ a - add ip address
+ g - setup default gateway
* x - exit menu
your choice: a
enable interface: ether1
ip address/netmask: 192.168.1.116/24
#Enabling interface
/interface enable ether1
#Adding IP address
/ip address add address=192.168.1.116/24 interface=ether1 comment="added by setup"
It will be a provider interface. Also specify the second interface for LAN and address for him.
+ a - add ip address
+ g - setup default gateway
* x - exit menu
your choice: a
enable interface: ether2
ip address/netmask: 192.168.0.1/24
#Enabling interface
/interface enable ether2
#Adding IP address
/ip address add address=192.168.0.1/24 interface=ether2 comment="added by setup"
Now specify the default gateway, select with the button "g" and enter the address.
your choice: g
gateway: 192.168.1.249
#Adding default route
/ip route add dst-address=0.0.0.0/0 gateway=192.168.1.249 comment="added by setup"
Leave from the second-level menu (key "x"), and from the first one (key "x"), setting ip addresses stored, default gateway is registered.
Let's try the second setting variant - manual.
View the list of available interfaces.
[mkt@MikroTik] > interface print
Flags: D - dynamic, X - disabled, R - running, S - slave
# NAME TYPE MTU
0 R ether1 ether 1500
1 R ether2 ether 1500
Activate the interface 0, which will be connected to provider and set him ip address.
[mkt@MikroTik] > interface enable 0
[mkt@MikroTik] > ip address add address=192.168.1.116/24 interface=ether1
[mkt@MikroTik] > ip address print
Flags: X - disabled, I - invalid, D - dynamic
# ADDRESS NETWORK BROADCAST INTERFACE
0 192.168.1.116/24 192.168.1.0 192.168.1.255 ether1
Do the same procedure with a local interface.
[mkt@MikroTik] > interface enable 1
[mkt@MikroTik] > ip address add address=192.168.0.1/24 interface=ether2
[mkt@MikroTik] > ip address print
Flags: X - disabled, I - invalid, D - dynamic
# ADDRESS NETWORK BROADCAST INTERFACE
0 192.168.1.116/24 192.168.1.0 192.168.1.255 ether1
1 192.168.0.1/24 192.168.0.0 192.168.0.255 ether2
Finally add the default gateway.
[mkt@MikroTik] > ip route add gateway=192.168.1.249
[mkt@MikroTik] > ip route print
Flags: X - disabled, A - active, D - dynamic, C - connect, S - static, r - rip,
b - bgp, o - ospf, m - mme, B - blackhole, U - unreachable, P - prohibit
# DST-ADDRESS PREF-SRC GATEWAY DISTANCE
0 A S 0.0.0.0/0 192.168.1.249 r... 1
1 ADC 192.168.0.0/24 192.168.0.1 ether2 0
2 ADC 192.168.1.0/24 192.168.1.116 ether1 0
Now you can continue to change settings using a graphical shell “winbox”, but since we started with the console, we will go all the way through with it, and then we will repeat what we have made from step 3, but in the graphic interface.
Step 3. DNS Configuration.
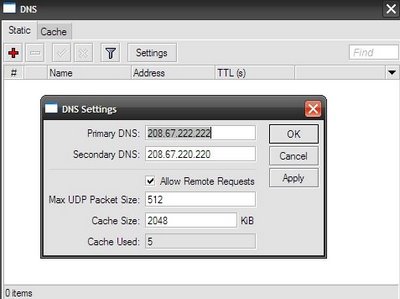
[mkt@MikroTik] > ip dns set primary-dns=208.67.222.222 secondary-dns=208.67.220.220
allow-remote-requests=yes
[mkt@MikroTik] > ip dns print
primary-dns: 208.67.222.222
secondary-dns: 208.67.220.220
allow-remote-requests: yes
max-udp-packet-size: 512
cache-size: 2048KiB
cache-max-ttl: 1w
cache-used: 5KiB
Step 4. Setting up access to the Internet.
First turn on masquerade.
[mkt@MikroTik] > ip firewall nat add chain=srcnat action=masquerade
out-interface=!ether2
Add rules for service packages.
[mkt@MikroTik] > ip firewall filter add chain=forward connection-state=invalid
action=drop comment="Drop invalid connection packets"
[mkt@MikroTik] > ip firewall filter add chain=forward connection-state=established
action=accept comment="Allow established connections"
[mkt@MikroTik] > ip firewall filter add chain=forward connection-state=related
action=accept comment="Allow related connections"
[mkt@MikroTik] > ip firewall filter add chain=forward protocol=udp
action=accept comment="Allow UDP"
[mkt@MikroTik] > ip firewall filter add chain forward protocol=icmp
action=accept comment="Allow ICMP Ping"
Then add the rules for machine PC4.
[mkt@MikroTik] > ip firewall filter add chain=forward dst-address=192.168.0.2/32
protocol=tcp src-port=80 action=accept comment="Allow http for server (in)"
[mkt@MikroTik] > ip firewall filter add chain=forward src-address=192.168.0.2/32
protocol=tcp dst-port=80 action=accept comment="Allow http for server (out)"
[mkt@MikroTik] > ip firewall filter add chain=forward dst-address=192.168.0.2/32
protocol=tcp src-port=25 action=accept comment="Allow smtp for server (in)"
[mkt@MikroTik] > ip firewall filter add chain=forward src-address=192.168.0.2/32
protocol=tcp dst-port=25 action=accept comment="Allow smtp for server (out)"
[mkt@MikroTik] > ip firewall filter add chain=forward dst-address=192.168.0.2/32
protocol=tcp src-port=110 action=accept comment="Allow pop for server (in)"
[mkt@MikroTik] > ip firewall filter add chain=forward src-address=192.168.0.2/32
protocol=tcp dst-port=110 action=accept comment="Allow pop for server (out)"
In the same way we set the rules for other machines, allowing them http, https, ftp, icq, jabber.
[mkt@MikroTik] > ip firewall filter add chain=forward dst-address=192.168.0.20/32
protocol=tcp src-port=80 action=accept comment="Allow http for pc1 (in)"
[mkt@MikroTik] > ip firewall filter add chain=forward src-address=192.168.0.20/32
protocol=tcp dst-port=80 action=accept comment="Allow http for pc1 (out)"
[mkt@MikroTik] > ip firewall filter add chain=forward dst-address=192.168.0.20/32
protocol=tcp src-port=443 action=accept comment="Allow https for pc1 (in)"
[mkt@MikroTik] > ip firewall filter add chain=forward src-address=192.168.0.20/32
protocol=tcp dst-port=443 action=accept comment="Allow https for pc1 (out)"
[mkt@MikroTik] > ip firewall filter add chain=forward dst-address=192.168.0.20/32
protocol=tcp src-port=21 action=accept comment="Allow ftp for pc1 (in)"
[mkt@MikroTik] > ip firewall filter add chain=forward src-address=192.168.0.20/32
protocol=tcp dst-port=21 action=accept comment="Allow ftp for pc1 (out)"
[mkt@MikroTik] > ip firewall filter add chain=forward dst-address=192.168.0.20/32
protocol=tcp src-port=5190 action=accept comment="Allow icq for pc1 (in)"
[mkt@MikroTik] > ip firewall filter add chain=forward src-address=192.168.0.20/32
protocol=tcp dst-port=5190 action=accept comment="Allow icq for pc1 (out)"
[mkt@MikroTik] > ip firewall filter add chain=forward dst-address=192.168.0.20/32
protocol=tcp src-port=5222 action=accept comment="Allow jabber for pc1 (in)"
[mkt@MikroTik] > ip firewall filter add chain=forward src-address=192.168.0.20/32
protocol=tcp dst-port=5222 action=accept comment="Allow jabber for pc1 (out)"
Repeat these rules for each machine like on the template.
And in the end forbid anything else that was not allowed above.
[mkt@MikroTik] > ip firewall filter add chain=forward action=drop comment="Drop all"
Step 5. Inbox.
Now we have to allow that to incoming connections to http, smtp and pop would automatically be placed on the server.
[mkt@MikroTik] > ip firewall nat add chain=dstnat dst-address=192.168.1.116/32
protocol=tcp dst-port=80 action=dst-nat to-addresses=192.168.0.2 to-ports=80
comment="NAT for http"
[mkt@MikroTik] > ip firewall nat add chain=dstnat dst-address=192.168.1.116/32
protocol=tcp dst-port=25 action=dst-nat to-addresses=192.168.0.2 to-ports=25
comment="NAT for smtp"
[mkt@MikroTik] > ip firewall nat add chain=dstnat dst-address=192.168.1.116/32
protocol=tcp dst-port=110 action=dst-nat to-addresses=192.168.0.2 to-ports=110
comment="NAT for pop"
If we are talking about the absolute minimum and simplicity, this was it. What actions were taken?
- Two interfaces were included ether1 and ether2.
- IP address were assigned for the interfaces.
- Default gateway was set.
- DNS server was specified.
- Rules were prescribed for machines with unlimited access.
- Rules were prescribed for machines with limited access to ports.
- Rules were prescribed for NAT access from the outside to the Web and mail servers.
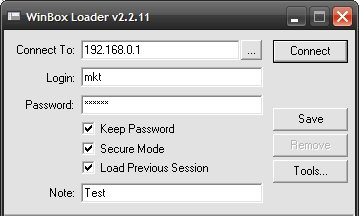
Now let's go back to step №3 and do the same steps, but in the graphical environment “winbox”, to download it, go to your mikrotik web interface called “webbox” and download the program from the home page.
Launch, specify the address of the local network, which was assigned to the second interface, user name and password, which was created in the beginning.
Step 3. DNS configuration.
The GUI's not much more complicated than in the console. Select from the main menu section “IP” and “DNS” submenu.
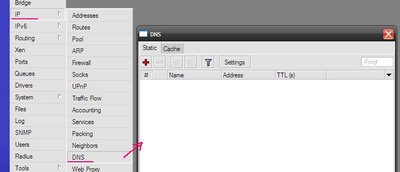
Here you can define static DNS entries, as well as view what now is in the cache. Click on the “Settings” button and specify the DNS server addresses.
Step 4. Setting up access to the Internet.
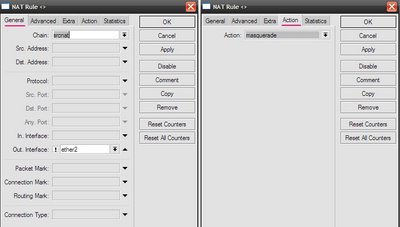
Turn on masquerading. IP “Main Menu”, “firewall” submenu, NAT “tab”.
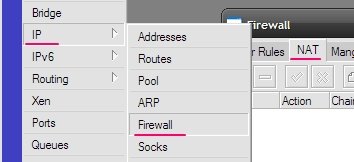
To add a new entry click on the plus sign. And then everything is the same as in the console, on the “General” tab chain = srcnat, “Out interface = ether2” and put a check, which means "NO", “Action” tab and select “masquerade”.
In the main menu select “IP” section, then “firewall”, in the window that appears, select “Filter Rules” tab. To add a new schedule click on the plus sign.
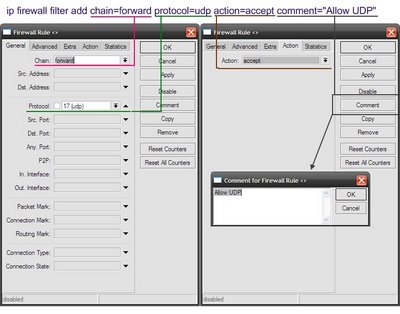
Allow UDP
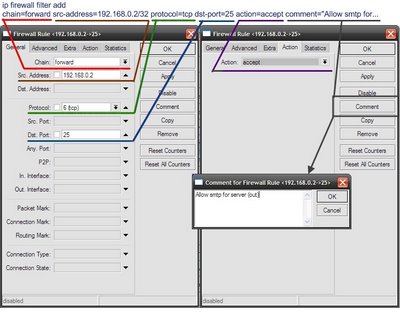
Allow outgoing connections from the address 192.168.0.2 to any address on the destination port 25, using tcp protocol.
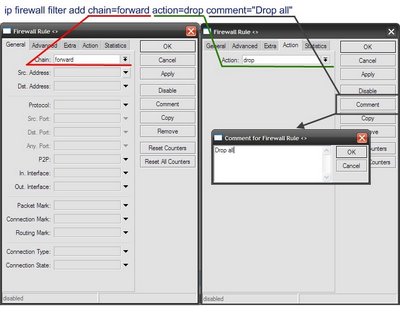
And in the end forbid anything else that was not allowed above.
Step 5. Inbox.
In the main menu select “IP” section, then “firewall”, in the window that appears, select “Filter Rules” tab. To add a new schedule click on the plus sign.
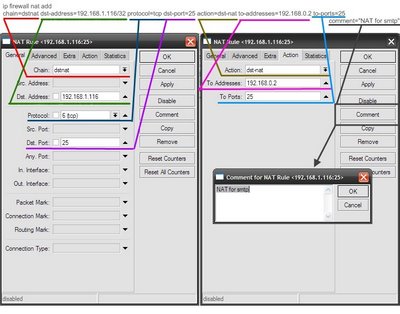
Redirect all connections coming to an external address 192.168.1.116 on the tcp protocol, port 25 on the local address 192.168.0.2 on port 25.
Using the same principle all the other rules are being built.
From the written above it is clear that any action can be done at least with two options, talking to MikroTik using text commands or mouse in the GUI. Both methods have their pros and cons.
The console is working faster even on very low channel, graphical shell is downloading interface modules to itself even before start, and then in the process creates a lot of traffic.
To work with console is definitely hard, but when you understand commands and principle of operation, it becomes not so important which interface is used to configure.
